Crimson Feature of the Month: Maximize Pledges
Pledges are a major component of political fundraising, and Crimson features can simplify tracking and managing these donations. Below are instructions for several tools that make reconciling and accounting pledges faster and more accurate including:
Pledges on the People Profile
Outstanding Pledge Search
Pledge Quick Search
Source Codes & Pledges
In-house Dates vs Deposit Dates for Pledges
Adding Bundler Tracking Numbers to Pledges
Using Events’ Pay Later feature for Pledges
How to Find Pledge Features
1. Pledges are located under the People Profile. Once the correct People Profile is opened, click on the Pledge panel.
Note: If you are unable to view the panel due to the size of your screen, then click on the blue bar to the right to access the additional features on a People Profile. A third column will appear, and the Pledge panel will be listed.
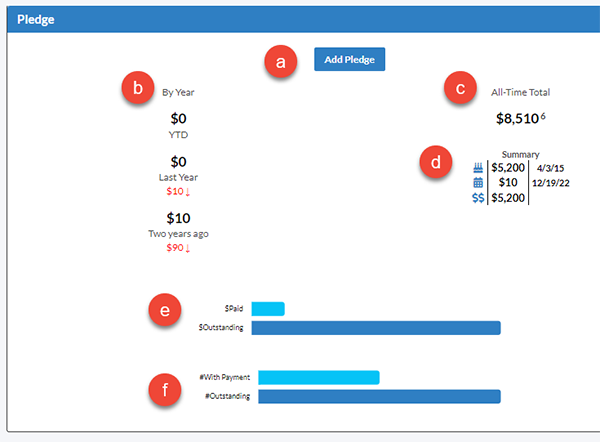
2. If you click on the Pledge panel, the Pledge Summary will populate under the People Profile panels on the lower left side of your screen.
3. The right-hand side of the Pledge Summary contains the following features:
a. Click on the blue Add Pledge button to record a new pledge.
b. Review pledged YTD, Last Year, or Two Years Ago.
c. Click on All-Time Total to see a list of all the pledges ever made by the donor.
d. Under Summary, review the date of the first pledge, the most current pledge and the largest pledge made in the donor's history.
e. Click on the $Paid and $Outstanding graphics to open additional details about pledges.
f. Click on #WithPayment and #Outstanding to see additional information about pledge payments.
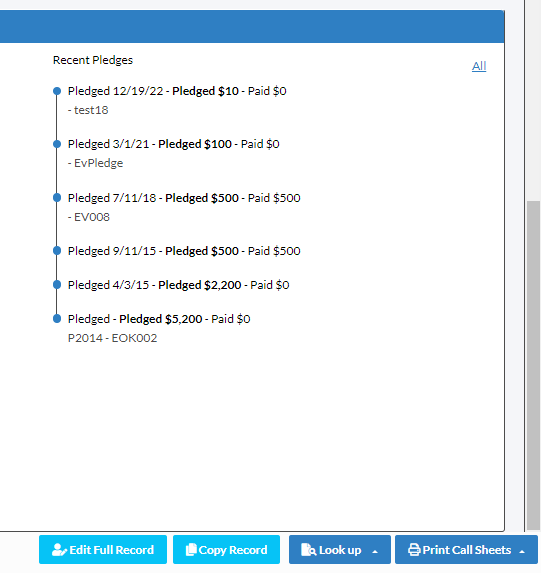
3. Under the lower right side, you’ll see a timeline of Recent Pledges.
4. Click on each Pledge to see details or make edits.
5. To the right of Recent Pledges, click on the All link.
6. A new window will open where you can search through the donor’s pledges by Fund, Source, Outstanding or Payment, and Date.
Outstanding Pledge Search
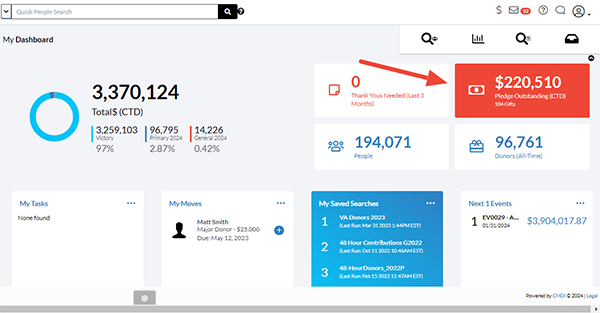
1. From the Crimson dashboard, the Outstanding Pledges card displays the total amount of unfulfilled pledges and the number of unfulfilled pledges made.
If you click on the card, a Pledges Search will open where you can pull a complete list of outstanding pledges.
3. Click the blue Edit button to open an individual pledge.
4. Click the blue Export button to download the results of the search.
5. If you want to adjust the search parameters of the Outstanding Pledges search, click on the Filters tab. Click on the toggle for "selected only." Additional filters will appear that you can use to customize the results of your search.
6. Click the blue Save button if you wish to keep this search for future uses. A new window will open for you to name the saved search.
Quick Pledge Search
You can also search for a specific donor by going to the Quick Search bar at the top of the page and changing the search to Outstanding Pledges in the drop-down menu. Then enter the name of the donor for whom you wish to search.
Use Source Codes to Automatically Match Payments to Pledges
When adding a pledge, Crimson requires you to complete the Amount, and Date field. If a Source Code and Fund Code are added, the pledge will automatically reconcile when a gift with matching details is added later via import or data entry.
Since a pledge is almost always recorded before the donation is made, the Source Code can prevent adding duplicate donations or spending additional time on data entry.
Without a Source Code, to match the gift to the pledge, the two will need to be reconciled manually in Crimson. Once a gift is entered that matches the details of the pledge, it will automatically be matched in Crimson. The details will display under the Payments tab.
Use Received In-House to Differentiate from the Donation Date
If you need to log that a check or payment was received before it has been deposited and entered via data entry, such as before a bank holiday, complete the Received In-House section on the Pledge. This way the fundraising team doesn’t have to wait for data entry to know what funds have already been received.
Enter the date of reception in the Date field or click the calendar icon to select the date from a calendar, and the gift amount in the Amount field. The pledge will still appear if you search for unfulfilled pledges, but the received in-house information will be visible in that search to avoid confusion about the status of the pledge.
Add Tracking Numbers to Credit Bundlers
If you have a bundler fundraising program, the Tracking feature will help you properly credit each donation. In the third column of the Pledge, enter the fundraiser's tracking number in the Track# field and then enter the amount of the donation to be credited to the fundraiser in the Amount field.
If you need to track multiple fundraisers or share tracking of a donation, click on the Add Fundraiser button to look up the tracking numbers for additional fundraisers and enter the amount to be credited. Under the Balance section, you can see what amount is remaining after a payment with the same tracking # has been linked to this pledge.
Pay Later Feature Under Events
The Pay Later feature allows event organizers to record a pledge at an event and connect it to a donor's People Record. For more information on this feature, please see the Crimson Helpdesk.
1. From the Event dashboard, either search for the event by name or click on Upcoming Events.
2. Click on the blue Edit button of the Event you wish to record the pledge.
3. From the Event listing, click on the Invitees tab at the top. Then click the Process $ button of the guess you want to add the pledge.
4. At the bottom, click on the Pay Later (Pledge) tab.
6. Complete the fields including Pledge Amount, Fund Code and click on the blue Save button.
7. A confirmation message should appear that the pledge was recorded.


